PRODUCTS

Relay lens
Lontry Authorized Distributor|iboson
Long-Distance Simulation Optics — Relay Lens
Why Is a Relay Lens Essential for Camera Testing?
● Reduced Testing Cost
Direct camera module testing requires extremely long distances and oversized test charts. By introducing a relay lens, the optical path can be compressed into a compact space, significantly reducing test distance and chart size—ultimately lowering overall testing cost.
● Improved Measurement Reliability
Relay-lens-based testing closely replicates real-world imaging performance while providing a standardized and controlled test environment. This effectively minimizes random errors and uncontrollable variables, greatly improving result reliability.
● Higher Production Efficiency
Due to widespread adoption in camera module inspection, relay lenses enable more compact production equipment, higher throughput, and lower operational cost—while also serving laboratory and R&D testing applications.
● Enables Special Application Testing
Effectively solves testing challenges for ultra-wide-angle cameras and infinity-focus scenarios that are difficult or impossible to achieve in real shooting environments.
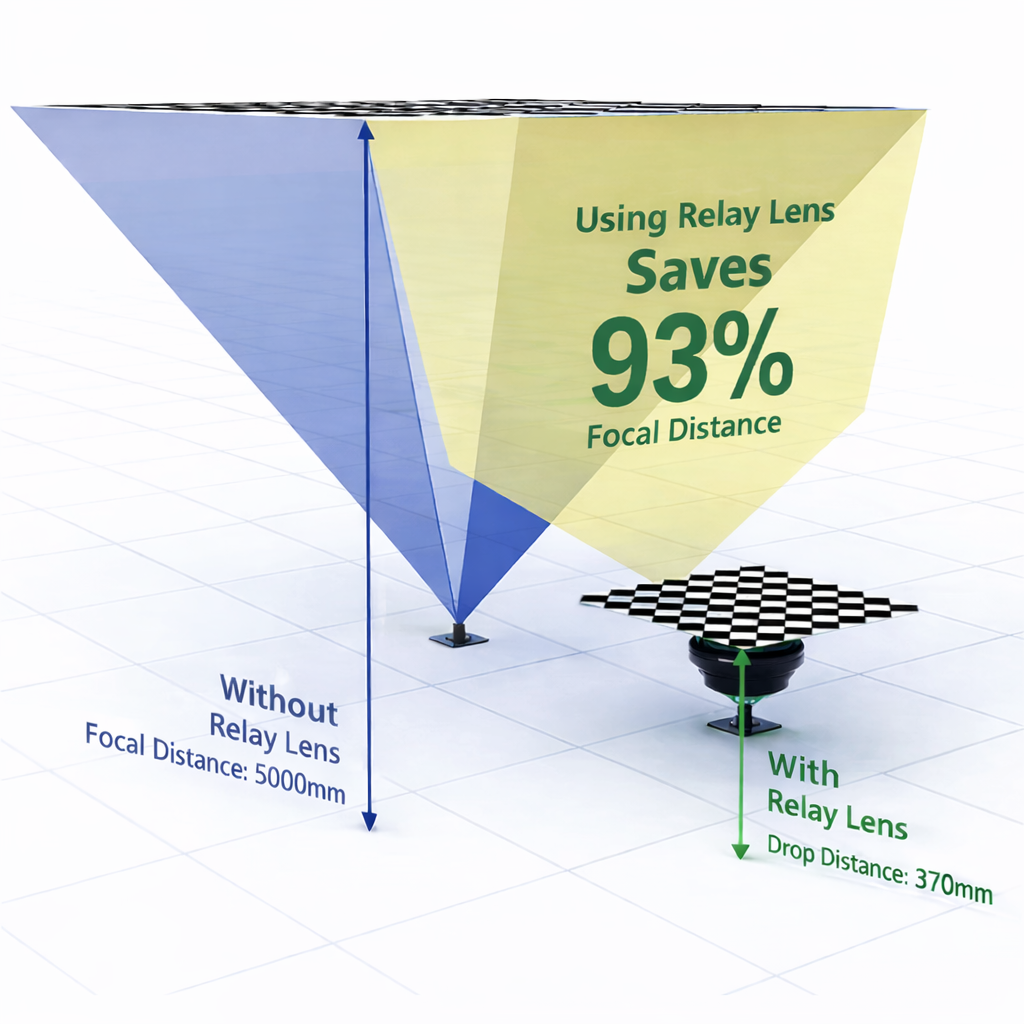
With Relay Lens Applied
93% Distance Reduction
Application Areas of Relay Lenses
Relay lenses are primarily used for camera resolution evaluation. As camera technologies evolve, relay-lens-based solutions have expanded across multiple industries and are now indispensable in wide-angle and telephoto module manufacturing and inspection.
.png)
.png)

Exclusive Feature
Simultaneous Visible + Infrared Imaging Support
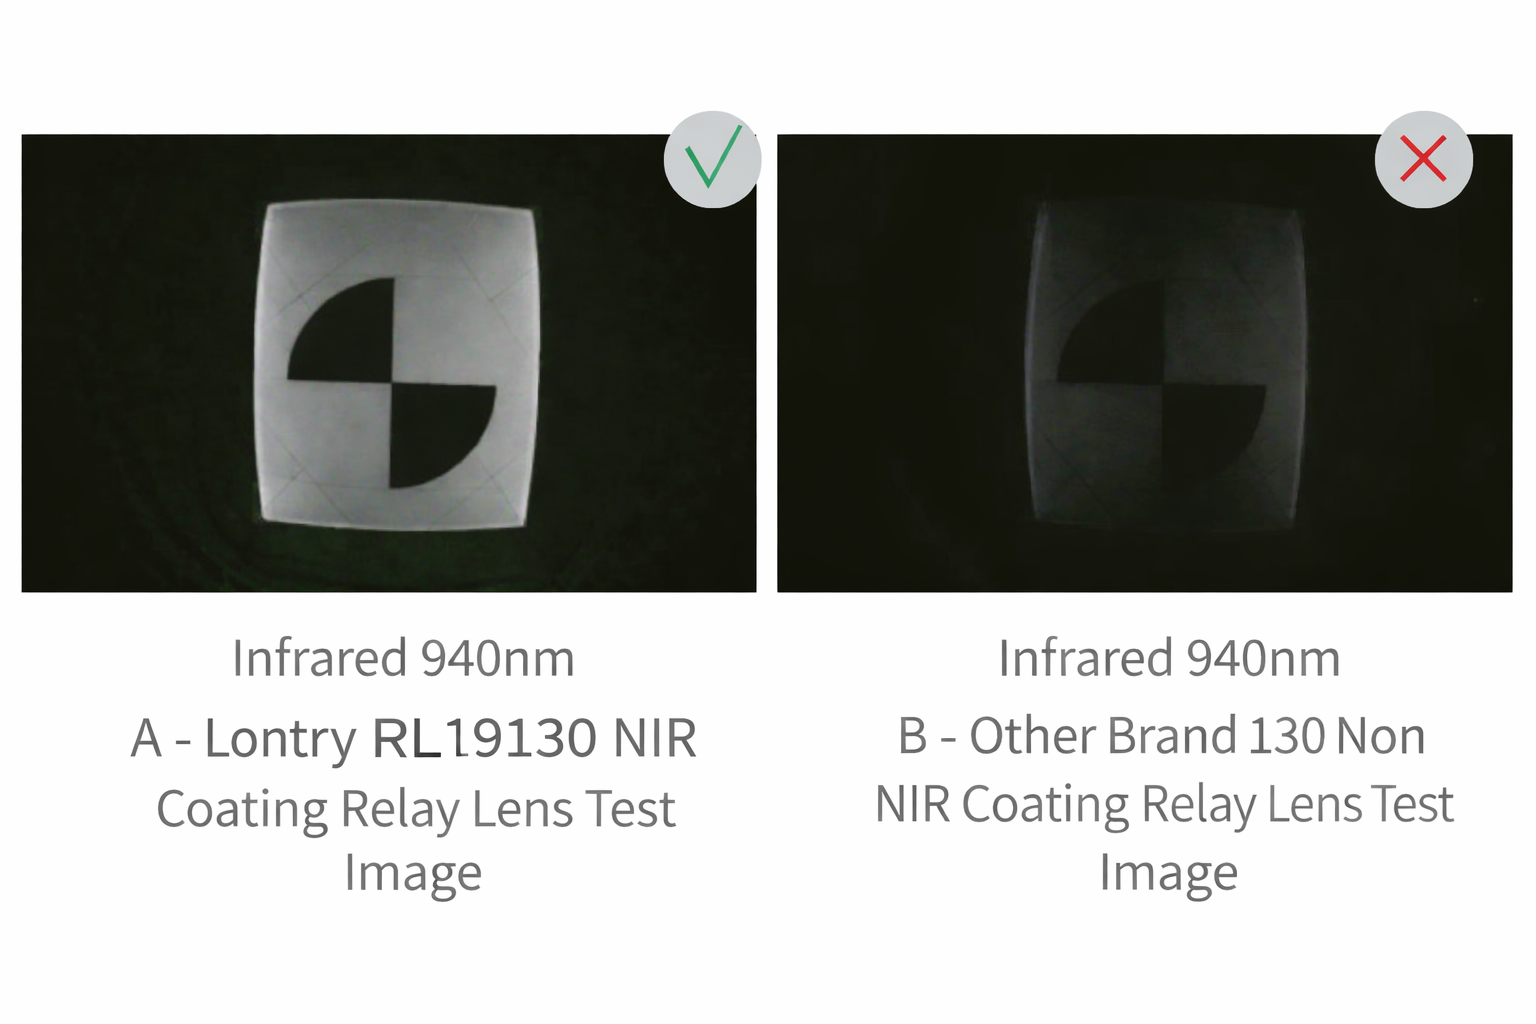
Designed for automotive and security night-mode testing, Lontry relay lenses uniquely support the 940 nm infrared wavelength, addressing a critical multi-spectral compatibility challenge in the industry.
● Industry Challenge
Conventional relay lenses often suffer severe resolution degradation under infrared illumination, resulting in blurred images that fail high-standard validation requirements.
● Lontry Advantage
Through proprietary optical design and coating processes, Lontry relay lenses maintain sharp imaging performance in both visible and infrared spectra—enabling dual-mode testing with a single system.
Three-Step Relay Lens Selection Guide
Step 01. Field of View (FOV)
Principle: Camera FOV < Relay Lens FOV.
Ensure full coverage of the camera’s field of view to achieve accurate edge resolution data.
Step 02. Aperture
Entrance pupil calculation: Aperture = EFL / F-number.
Relay lens aperture must be equal to or larger than the camera’s entrance pupil to prevent distortion and resolution loss.
Step 03. Mechanical Distance (MDR)
Defined as the distance from the relay lens bottom surface to the DUT entrance pupil.
Installation tolerance must be controlled within ±0.5 mm.
Important Notice: Ignoring the true entrance pupil position can significantly reduce SFR accuracy in high-precision testing.
Relay Lens Technical Terms (Lontry Standard)
| Parameter | Abbreviation | Meaning |
|---|---|---|
| Field of View | FOV | Maximum supported field of view of the relay lens |
| Aperture Diameter | Aperture | Maximum supported stop/aperture diameter |
| Focal Length | f | Larger focal length implies longer chart distance and larger chart size |
| Mechanical Distance | MDR | Distance from DUT entrance pupil to the relay lens bottom surface |
| Virtual Image Distance | WDV | Target simulated image position (e.g., infinity) |
| Chart Distance | WDC | Distance from physical chart to the relay lens top mechanical surface |
Naming Example (RL11125)
RLRelay Lens Series
|
11MDR = 11 mm
|
125FOV = 125°
Key Elements of a Typical Relay Lens Test Setup

1. Standardized Light Source High-uniformity flat-panel backlight module
2. High-Resolution Test Chart Transmissive film chart
3. Lontry Relay Lens Core long-distance simulation optics
4. Precision Test Fixture High-precision 6-axis / Z-axis stage
5. Device Under Test (DUT) Mobile / automotive / security camera modules
6. Algorithm Software Automated image analysis system


